Richard Skinner
Here we are – Part Two of the series on creating your own covers. The next step is deciding what pieces of other people’s work are going to be incorporated into the cover. So…
Find the Starting Point(s)
First off, I’m making the assumption that your budget for cover art is like mine – low to non-existent. So your sources for the starting points are rather restricted. Although, to be honest, these days that is not all that much of a handicap. Graphic artists and photographers discovered the internet some time before we indie writers did – there have been low-cost and no-cost sites up there almost since the dawn of the technology.
The three sites that I use – in decreasing order of my being likely to find what I need on them:
The site I use the most, largely because of its sheer convenience and selection of free images. All of the photographs here are free, and licensed (under Creative Commons) for commercial use. (You will see “sponsored images” from Shutterstock in various places – they are plainly watermarked as such. Those are not free, so unless you really, really need that photo, which you are unlikely to, you can just skip those.)
Now, you do need to set up a Pixabay account to download the high resolution photos. Just browsing, no, so go ahead and take a look there yourself right now. I had problems getting my account set up, which you may not have – they send you a confirmation email with a link that you need to finish your account setup, and for some reason that email never got through to my usual inbox. Nor in the spam folder. It just plain disappeared in transit. Very, very annoying… Anyway, I did finally get my account running by creating a Hotmail account and registering through that one. If you use one of the “free” email services yourself, I think that you won’t encounter my difficulties (maybe).
Dreamstime – https:/www.dreamstime.com
Dreamstime has some free images. Honestly, though, I have never found one that I would ever consider for a cover starting point. People with more graphic arts chops than I may be able to create something from them, but I certainly can’t. Note that you do need an account here to even look at very much, although I did not have any problem setting one up.
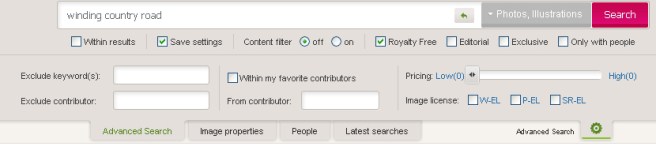
Most of the images are very low cost, though – so long as you are very careful about how you set your search filters. Always turn on the advanced search – the little gear sticking out below the search banner. For basic searches, on the Advanced Search tab, make sure that the Royalty Free box is checked, and that the Editorial and Exclusive boxes are not checked. For purposes of a low cost cover, the basic royalty free license suffices just fine, you don’t need an exclusive license. You absolutely want to avoid anything that has just an editorial license; that one does not allow you to alter the image, and is very problematic for commercial use. Also make sure that all three of the “extended license” boxes are unchecked – you don’t need any of those licenses for a cover.
Now, on that Pricing: slider – watch that little gadget. I have set it several times, done a search, decided to change my keywords, went back – and it has quietly reset itself to all price levels. Extremely annoying, especially when you have found the perfect image, and come to find out that it is outside of your budget. Set your desired price range and make sure it is still there every time before you click that Search button.
Pricing. Now, here’s an issue that gets rather complicated with Dreamstime. They have two options for buying images – one is a subscription plan, the other is a “credit” scheme. I do not recommend the subscription plans – the lowest cost one is, as of this writing, $39.00 (US) a month, and allows you to download five images in any one month. Way too expensive unless you are doing a lot of covers, and you expect to make a fairly good income every month. The other way is credits – which is what you are setting that price range slider for in the search options. Click on the Prices and download plans in the upper right hand corner of any page to access the current pricing schemes, then on the Credit packages tab. Right now, you can buy 11 credits for $14.99 (US) – which will then buy you about two of the cheapest images (price level 0) at the “medium” or “large” sizes, which is usually what you want.
So here you have to balance your budget against what they have to offer. Not nearly as easy as Pixabay. One thing that I do highly recommend – when you find an image that you think is a possibility, click on it to get the page for it, then right click on the image, select Copy image from the dropdown, and then put it into a new GIMP file. What you have is nothing like you’ll need for your cover – it’s low resolution and will have the watermark on it (no, even if I did know how to get rid of those, I wouldn’t tell you). But you can “play” with it a bit to see whether it really will work for you, before you lay down your money.
Just for reference, here is what I set the search parameters for when looking for the road image in Tales By The Road (although I ultimately did not end up using Dreamstime for that cover). Someday I will be qualified enough to play with the Image properties tab – but that is definitely a subject for much later.
 |
DeviantArt – http:/www.deviantart.com/
Okay, I have to admit that this is more of a guilty pleasure than a site that I look at for cover sources. Although you can find some great cover ideas here, when you are feeling artistically dead…
The absolutely fantastic artists that put some of their work up here can get you lost for hours, literally. A real productivity drain. But – do bookmark the site. There will come a time (hopefully) when you are looking for a professional artist. When you do get to that point, this is a good place to start – look at portfolios, especially if they have done covers for other people, find the person you want to use (and, this being a wide open site, check their references), and open negotiations. (On that, get yourself a copy of Kristine Rusch’s How to Negotiate Anything book. The vast majority of writers – your host included – are completely unskilled negotiators. Kristine’s book will save a lot of heartache when its lessons are taken to heart.)
*****
Whew! That was quite a bit on just the places to get images. On to actually finding the image(s), and getting them onto your system for later manipulation with GIMP. (I’m afraid that I’ll only be showing you how to dig around through Pixabay images, since those are what I ultimately did use as my starting points.)
First, though, before we start playing keyword and search box bingo – let’s refine just what we’re looking for in the images. Now, I didn’t write anything down when doing Tales By The Road – I was pretty much in the role of full time cover “artist,” and I was the only one doing it, so I did just fine with a mental “checklist.” In the future, though, I am going to start getting at least a brief description down, which will be a big help to the spouse when she is trying to cut down the mass to a reasonable number to ask me about. It will also help if you are paying someone else a small amount to simply put images together. Or even if you are still doing the whole thing, but in chunks of “as available” time. Note that the descriptions below are only for the elements that I ended up putting into the cover. I discussed my horrible waste of time looking at people last week – I have way too many images of old men sitting on my computer now.
The road – The Road is a character in the story, so it is really the most important image to get right, for certain values of “right.” I want a road with absolutely no traffic on it, and no urban setting (ideally, with no evidence of Man whatsoever, other than the road itself). It should be winding, not ruler straight – or perhaps just a curve – to have at least some visual interest. Viewed from a normal standing ground level – not aerial, not “artistic” from someone laying down or crouching. Paved, probably with asphalt, but “pebbly” (something like a freshly oiled and graveled surface?), because I’ll want to add a bit of unusual color to it for a slightly not of this time period look. Without our modern lane markings if at all possible. Not all beaten up, either, this is supposedly an advanced material.
The desert – a sand desert, not a Southwestern type desert. Gobi-type, Sahara, something like that. No vegetation whatsoever, or easily removed for whatever little is there. No people, vehicles, etc.; not even an indication of same (no tire tracks). Just pure sand. Already of a reddish cast (around sunset) if possible. Oh, no dust plumes, the air should have been just about absolutely still when the picture was taken.
The sun – a red giant artwork if possible. That may be hard to find for a free picture, so a sunset, or a red-filtered picture could work as well. I need about two-thirds or three-quarters of it, and it needs to be cloud-free. Sunspots? I really don’t have an absolute preference, although it should probably not have too many; from what I recall, those should be less likely on a red giant? (Not going to research that, going to go with my memory there.) Come to think of it, I can probably go without it being extremely red; I can play with “reddening” it in GIMP.
*****
Okay, now I know what I’m looking for, along with where I’m probably going to have to be flexible. Off to Pixabay! Let’s try “winding country road”…
Urk. That returns seven Shutterstock images, none of which would work anyway even if I were able to shell out money for them. Only six free images. Ouch. One of them might work, but would be a headache to get fixed up. Cracks in the pavement, lane markings, the end of it fades into vegetation… Time to get more sophisticated, I know that other people can make this work, there has to be a way.
Start digging. Sigh, no help straight from the Pixabay page. The FAQ? Uh-uh. Time to Bing it. Ah-ha, found it! Pixabay actually uses a pretty darned sophisticated search system, but the only place you’ll find anything about it is down in one of their blog posts. So that you won’t use up your valuable time – it’s at https://pixabay.com/en/blog/posts/advanced-image-search-on-pixabay-46/. Read it, and experiment.
Armed with the “professional-grade” knowledge, here’s the second (well, actually, fourth or fifth) search criteria: “(country OR countryside) AND (road OR winding)” – much better. Free images are now 775, I surely should be able to find something there. And so I did. Tip: learn to scan the images very quickly. Even with the best of search criteria, there are going to be some there that aren’t at all what you’re looking for. For example, I have no idea what a bee flying near to what looks like an orange tree branch is doing in my results. It can be worse – for some reason my later search for the desert pulled back a lot of images of somebody’s laptop in various orientations.
I also use the little gearbox (for settings) up in the top right corner of the results page to show 150 images per page. That just makes it seem a bit less daunting, when you only have six pages to go through rather than eight (for this search).
Now, on Pixabay at least, when you see a “possible” image, you can take a better look at it by hovering over it with your mouse. If it still looks good, click on it, and you will get the page for that particular image up. Don’t get ahead of yourself, though, and download it right now; go through all of the images first. (I mean that – I have found a good enough image on the first page – and then the image on the last page.) But do save the location – either copy down the web address for that page, bookmark it, or do like I do and “save page as” to somewhere on your hard drive (for me, on Firefox, that is a simple “Ctrl+S” and then the “Enter” key).
You’ve found the image(s). You do have the exact pages marked somehow, yes? You do have your Pixabay account all set up, yes? Time to hit the big green Free Download button over on the right hand side of the image’s page. When you do that, always select the highest resolution image that you are offered; scaling it down, as well as other manipulation, is a job for GIMP – not the Pixabay graphics engine. Save it somewhere that is logical for you on your computer. (For me, and for Tales By The Road, this was in the “Writing\Short Stories\Tales By The Road\Tales By The Road\Cover\Working\Sources” – yes, quite a ways down, but I never, ever find anything that I put into a “My Whatever” folder.
I’m not going to subject you to the whole process for the other two elements of the Tales By The Road cover. Bell time is coming close. But here are the three photographs that I ended up with in my “Sources” folder (seriously scaled down for the blog).
 |
It has lane markings, I’ll have to get rid of those somehow. (This actually turned out to be fairly easy in GIMP – I’ll be showing you how.) The asphalt/gravel surface texture looks fantastic though, exactly what I was looking for. Nice curve to it, and bright white lines along the edge to help me mask it out from the background. Just about a win-win. |
 |
Nice and red. All sand, no tracks. Hmm, a few “artifacts” of what look like people off on top of the dunes; need to get rid of those, but otherwise pretty darn good. All right, looking at the road, these aren’t going to work all that well together as-is. But there has to be a way to flip the desert over from left to right, and to get a “flatter” look for it. (Yes there certainly are ways in GIMP, and they are actually simple.) Winner. |
 |
I knew this was going to be a problematic image to find. But this one will do – fairly red color, although I’m going to try to make it a bit darker (which was not a complete success, as you’ll see later). Once I flip it over from top to bottom, I can just crop off the clouds at the bottom; the background is black, too, which will make it easier to mask off, or just leave alone, since I’ll have a black sky on the cover. I’ll go with this one, definitely. |
Phew. Enough for one lesson. Go, now, and apply my “wisdom.” Next week – well, I haven’t fully decided on next week, yet. I may continue with actually building the Tales By The Road cover. But I am also digging back through the homework readings that I gave you last week. With two covers now “under the belt,” I am considering the advisability of taking those, folding, spindling, and mutilating them – to show you all of the places where I went wrong with those designs (and a few places that I think I did right). Check back next Wednesday (hopefully).
*****
Useful Links – Find the Starting Point(s)
First, where to get the graphic arts packages – to follow along later, you’ll need them.
GIMP (GNU Image Manipulation Program)
https://www.gimp.org/downloads/
The link to download the installation program. This takes quite a while to download and install.
You also want the manual, believe me. No, there is apparently no downloadable file; you have to use the online version, which can be inconvenient. Myself, I open it up in the Silk browser on my Kindle Fire.
Krita
I’m including the link to their home page here, even though I don’t use Krita (right now, at least). Really, this is a package oriented to the “real” graphic artist. But, if you find yourself with some time, it can be enlightening to watch some of the videos that Krita users have put up on their site; those are awesome.
Filter Forge
Okay, it’s not free. Okay, I didn’t use it on my first cover. Take a look anyway, it’s not all that expensive. (I managed to snag a free copy when they transitioned over from Version 4 to Version 5 – you might get so lucky, as they will apparently be going to Version 6 in not too long. I’m currently dithering over whether I’m brave enough to take a shot at their beta for that…)
*****
To repeat the image site links from above.
Pixabay
Figure out effective search criteria, and I honestly think this is the only site you really need for almost anything you want to do on a very tight budget.
Dreamstime
Again, a more “advanced” site – and with very few free images. But they are low cost, and if you cannot find something on Pixabay, there’s a good chance you will here. Watch the search criteria and licenses, though, as I noted earlier.
DeviantArt
More of a way to spend an enjoyable couple of hours if you have them. But you may find your cover artist here when you need one for that more “professional” look.
*****
Important legal – and professional development – stuff.
Creative Commons License (Pixabay)
Yes, it’s in legalese. No, it’s not all that long. Yes, you need to read and understand it if you plan to use any image from the site.
https://creativecommons.org/publicdomain/zero/1.0/legalcode
Dreamstime Terms and Conditions
Yes, it’s in legalese. Yes, it is mind-numbingly long. Yes, you need to read and understand it if you plan to use any image from the site.
https://www.dreamstime.com/terms
Negotiating
Kristine Rusch’s book. Read it before you even start talking to a possible outside cover artist. Really, I mean it!
*****
For convenience, the link to last week’s post.
